|
|
Basket
0 items, £ 0.00
How to Knit an I‑Cord on Straight Needles and Double Pointed Needles
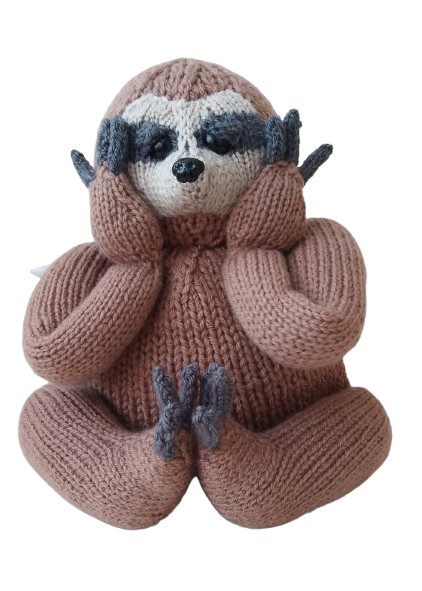
Most TeaCosyFolk patterns don’t use i‑cords, but for the Sloth Tea Cosy they’re the neatest way to make the claws. This guide shows two simple methods for knitting an i‑cord on straight needles or double pointed needles, so you can pick the one that feels easiest.
What an I‑Cord Is and Why You Might Need One
I‑cords are one of those simple little knitting techniques that pop up occasionally, and once you know how to make them neatly they’re very handy to have in your toolkit. They’re perfect for ties, trims, loops and small character details, but I don’t use them often in TeaCosyFolk patterns because they can look a bit fiddly and sometimes put knitters off. Every now and then though, an i‑cord is the neatest and most natural option. The upcoming Sloth Tea Cosy, which will be released on 21 May 2026, uses simple i‑cords to create the sloth’s curved claws, and they give a really clean finish.
An i‑cord is basically a narrow knitted tube made from just a few stitches. It looks clever but it’s very straightforward once you understand the rhythm of it. If you’re curious about the background of the technique, you can learn more about the history of the i‑cord on a trusted external resource. This guide explains two easy ways to knit an i‑cord: one using straight needles and one using double pointed needles. Both methods create the same tidy little tube of knitting, so you can choose whichever suits the needles you have to hand.
How to Knit an I‑Cord on Straight Needles
To knit an i‑cord on straight needles, cast on the number of stitches you need, usually three to five. Knit across the row, but instead of turning your work, slide the stitches back to the right‑hand end of the needle. Bring the working yarn firmly across the back of the stitches and knit the next row. You keep repeating this sliding and knitting until the i‑cord is the length you want. The yarn being pulled across the back draws the edges together and forms the tube.
How to Knit an I‑Cord on Double Pointed Needles
To knit an i‑cord on double pointed needles, the steps are almost the same but easier because the needle has points at both ends. Cast on your stitches, knit across, slide the stitches to the other end of the needle, bring the yarn across the back and knit again. This method is especially good for longer i‑cords because the sliding is smoother and the tension stays even.
Tips for Neat, Even I‑Cords
Both methods work well. Straight needles are ideal for short decorative cords, while double pointed needles are great for longer lengths or when you want a quicker flow. The key to a neat i‑cord is keeping the yarn pulled firmly across the back each time you slide the stitches. A smooth yarn like Stylecraft Special DK helps the stitches sit evenly, and a light block at the end can tidy everything up if you want a very polished finish.
I‑cords aren’t common in TeaCosyFolk patterns, but when they’re the right choice they add a clean, characterful detail. Once you’ve made a few, they’re quick, easy and very satisfying. And if you’re planning to knit the Sloth Tea Cosy when it arrives in May, this is a good time to get comfortable with i‑cords because the claws depend on them.
I‑Cords: Simple, Neat and Easier Than They Look
Tags: