|
|
Basket
0 items, £ 0.00
In this section...
Casting On In The Middle of a Row Help
This video from TeaCosyFolk shows you how to cast on in the middle of a row using the two needle method.
In the video I am making the helmet for the cyclist tea cosy and the rolls of knitting for the top of the helmet.
Top Tip when Embroidering on the Face
Embroidering a face onto your tea cosy’s head is a really important part of the sewing up of a tea cosy. The face, after all, is what we first look at and what gives the tea cosy its character, so it’s really important to get it right.
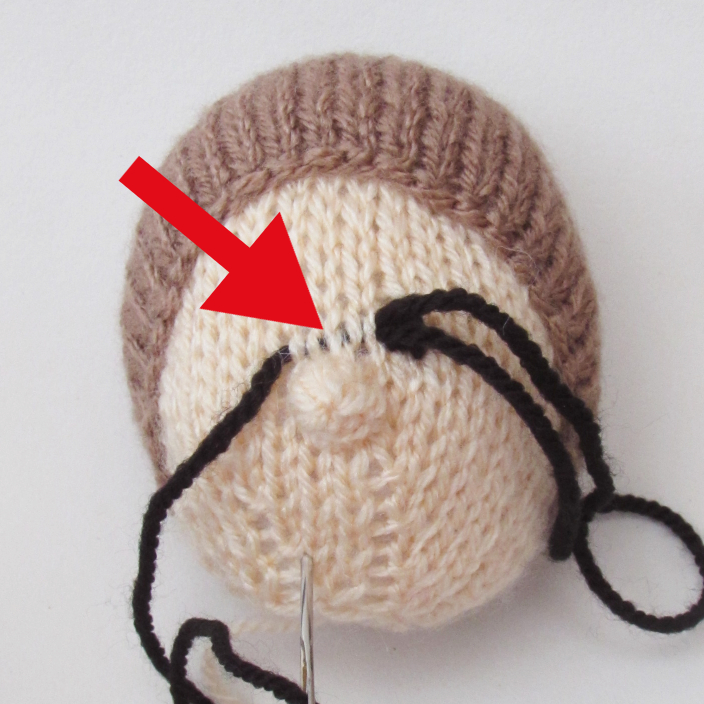 After you have embroidered on the first eye, it’s common place to pass the yarn through the head to the site of the second eye. My tip today is to make sure that when you do pass the yarn through the head is that you do it so that the yarn is embedded in the stuffing, and not laying close to the surface of the knitting.
 If the black yarn is passed just beneath the knitted fabric, it can show through, and it really spoils the appearance of the face. But if the yarn is surrounded by stuffing, it can’t be seen through the surface of the knitting and it gives a much crisper finish.
Knitting Pleats Help
Knitted pleats look amazing, but when you see the instructions written down they can look quite daunting because you are working with three needles. I always find that it's a whole lot less scary when you have seen how its done, and believe me, its a doddle.
I use the knitted pleats on the Suffragette and Mammogram knitting patterns for the bottom of their skirts.I hope you find the video helpful.
Lost Your Knitting Mojo?
My top tip to regain your mojo is to make yourself a daily target. Depending on the size of a project, you could set a target of knitting 10 rows a day.After a while, a week or two, you may want to start knitting more than the 10 rows target a day and that's ok. You can always knit more rows but not less than the target.
Eventually you'll work your way past the non-knitting phase and get back into the habit, and your project will have moved forward a little and might even have reached a part that helps you begin to enjoy it again.
How to Pick Up and Knit Stitches Evenly Along an Edge
So, it's worth marking the edge at the halfway point, and the quarter points, and maybe be even points in-between if it's a really long edge. You don't have to be a maths genius, just fold the edge in half and mark the point of the fold. Then fold each half and mark to find the quarters.Then divide the stitches into halves or quarters. If you have to pick up and knit 44sts in total pick up 11sts in each quarter, or 22sts in each half.
Picking up and knitting stitches in this way over a smaller distance makes it much easier to achieve evenly spaced stitches and it only takes a few moments to set up, and you'll get great results.
Sewing in Ends Securely
What I like to do is to instead of sewing in around a stitch, I like to split the stitch so that the end of yarn fibres will work into the stich fibres to hold it more securely.Also when I cut the end, I don't cut it flush to the work; if it's not going to be visible, I like to leave a couple of millimetres on the end so that it doesn't start to work its way to unravelling.
Getting Safety Eyes Through Knitting
A quick tip is to use a knitting needle to clear the way. Push the knitting needle in where you want the eye stalk to go and then wiggle it about a bit to open up the stitches and to move any obstacle out of the way.When you take the knitting needle out the eye should go in a lot easier. If it doesn't repeat with more vigorous wiggling.
Carry Yarn up the Sides
If you 'carry' the yarn up the sides of the work, you can carry the yarn for up to 6 or 8 rows as long as you leave the yarn slack enough. Then when you change colour there are no ends of yarn to sew in - Happy days.If I carry the yarn, I tend to say 'change to' in the pattern. If you need to cut the yarn and add something new because you can't carry the yarn I tend to say 'break and join'.
Where to Position Ears
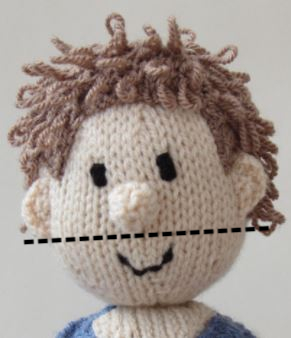 Try to line up the lower edge of the ear with the bottom of the nose, this tends to be the right height for ears to be.
You can check to see if this is the case for your own ears and nose.
Sewing Up Skinny Bits
I find that I have this problem most often with arms with attached hands, especially for the tea cosies with bodices and skinny arms. The shaping usually says that the wrists goes into about 4 or 5 stitches and when you have taken some of that to sew the seam, it doesn't leave much room to turn the work.What I do is to sew the hand first, and turn it the right sides out. Then I put the right sides of the sleeves together ready to sew; but then I tuck the hand inside the sleeve, so that it is completely enclosed in the sleeve. Then taking care not to sew through the hand inside, I sew the seam of the sleeve in the usual way.
When you turn the sleeve, the tricky bit at the wrist has already been done and it actually gives you something solid to grab hold of to help you turn the work. It's a great technique and really helps - try it!
Stuffing With Left Over Yarn
When I'm stitching up a project I do tend to tuck end tails left over from sewing up inside the work. Why not? If I cut the tail, it would only go to landfill, so better that it help to insulate the teapot.My tip this week is if like me you tuck the tails in, only do so if the tail is the same colour as the thing you are stuffing. If you are stuffing an arm or a leg say; you may have two or three colour changes - in this case I would cut the yarn tails because it spoils the look of the finished project if you can see different colour yarn showing through the stiches - especially if it's a strong colour.
Knitting Lacy Patterns
However, whilst knitting the Naked Gardner tea cosy recently, the main cosy is a holey pattern and after a couple of repeats my holes stared appearing in the wrong places. My mind must have gone off the job. After pulling back to the correct pattern, I started again, but this time I popped a stitch marker on every time I got to the repeat star in the knitting pattern. This meant that I had the same number of stitches between the markers. Then as I worked, if my stitches didn't fit before the next stitch marker I knew something was amiss. And so fewer stitches to pull back if I did go wrong.I thought it was a great little tip that I needed to share on my tips page.
 Sometimes if I feel unsure about a knitting stitch, I like to watch a video of how to do it, just to give me reassurance.
Of course, these days, you can find an abundance of free knitting help videos on Youtube and they show you everything from how to knit faster, to how to knit bobbles, there are even some complete knitting projects on Youtube that you can sit and knit along with.
I have made a few knitting pattern help videos to accompany TeaCosyFolk knitting patterns, you can find them here. If you click the subscribe button, it will bookmark these videos for you so they are easier for you to find at a later date. I try to make a video if ever I think a bit might look a little bit tricky just written in the pattern.
Digital Row Counters
Remember those scrappy bits of paper with tallies drawn on them? Even worse when they are written on the pattern. All that delayed time picking up a pencil or pen, then someone walks off with your pen. And I remember thinking 'I can count 10 rows, I won't need to write this down' and then the phone rings mid rows and I couldn't remember where I got to.No thanks - too stressful!
I bought myself a digital row counter that I wear on my forefinger of my left hand, and I haven't looked back since. I use it every time I knit.
It's so easy to use, just tap the big button with your thumb at the end of a row. No paper, no pencils, and no stress.
What is amazing about it is when you're knitting in the car. Tally charts are a nightmare in the car, you go around a corner and your paper and pen whizz off. Or you open a window and your paper flies out. Trust me, digital row counters are amazing little gadgets!
Stop Things Levitating
Because Price and Kensington teapots are ball shaped, the bottom edge of the main tea cosy tucks under the teapot slightly and this means that the bottom of the tea cosy isn't the bit that is level with the table.When you are pinning and sewing added parts to your tea cosy its always best to have the main tea cosy on the teapot and to place the teapot on a hard surface. This is especially important if you want to have something standing next to the teapot.
When the teapot is resting on a table, you can then offer your added part over to the cosy and have that so it's base is also resting on the table, and at the same time touching the tea cosy. Pin where the two meet and then remove from the teapot to sew into place.
If you skip the teapot and standing on a table, you run the risk of your parts looking like they are levitating, and this spoils the overall look of the tea cosy.
It's a Stitch Up
On the whole people usually say that they hate a lot of sewing up. Some people say they haven't finished a project because they have left all the stitching till the end, but then don't want to sew it together. It seems very sad to have come so far to stop at the stitching up. But I do know what they mean.I know it's all personal preference, but I like to stitch as I go, purely because I don't like a lot of sewing up at the end. However, I do like to sew everything for a head and pin it into place before I sew it down. Sometimes I put the hair and nose on, but then the ears go on and I feel the nose needs adjusting or the hair needs pulling down a bit. Once it's all stitched you lose that flexibility. But once I'm happy with the head, I will sew everything to the head and then sew the head to the main part.
I write my patterns so that you can sew as you go, because this is how I like to work.
I would always recommend stitch as you go, to make the task at the end less daunting.
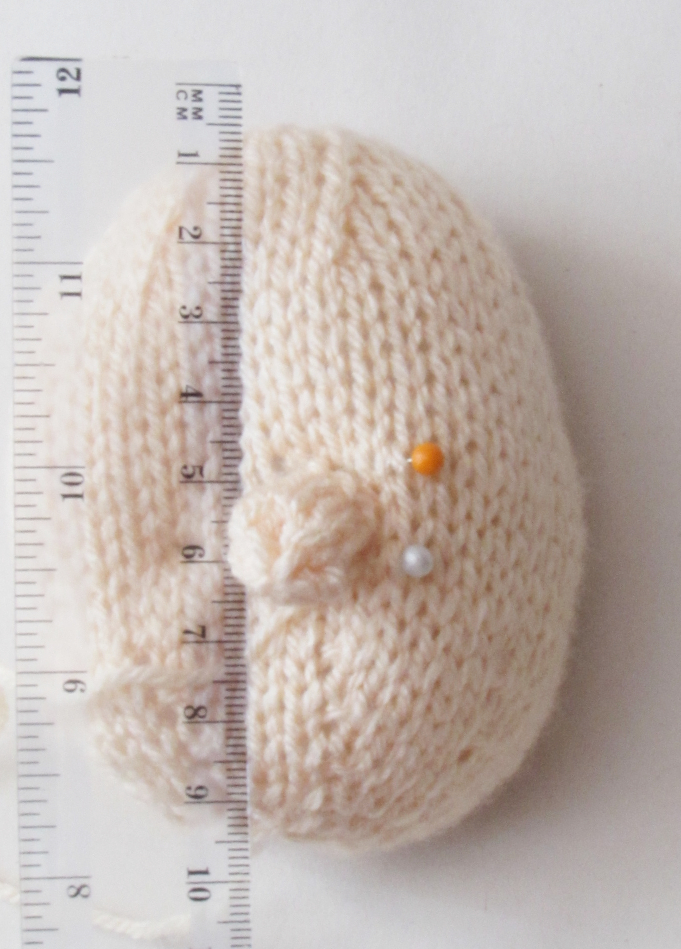
Stuffing
I know in the past it was thought old tights were a good stuffing material, but maybe not the best for stuffing a knitted thing. I don't think that a knitted fabric is robust enough to contain tights. Plus, the colour of the tights shows through the stitches and doesn't look great.I always use a polyester toy filling. It's more manageable and you can mould it. It's nice and white so keeps your yarn colours true. It's also light weight ' perfect for modelling with.
When you start to stuff, pull your stuffing to bits first and fluff it up, you don't want lumpy stuffing. Start to stuff with small amounts at a time. Mould as you stuff to make the stuffing sit to the shaping of the knitting. Keep stuffing with small amounts and moulding until the part is full.
Under-stuffing can sometimes be a problem. If you don't stuff enough, the parts will be smaller and less able to stand by themselves, especially over time and repeated use. Get into the habit of stuffing well, so that the stuffing is compacted and firm but so that it's not bursting the stitches on the right-hand side of the work.
Just as an example, the average head for a TeaCosyFolk medium sized character tea cosy should be about 9.5cm from top to bottom and about 7.5cm across.
Stitch Markers
I bet you have seen that graphical joke that gets posted on Facebook; The one that say "I see you like to live dangerously - no stitch markers"; well, that was me. The pattern would say to use a stitch marker or mark the row and I would shrug and carry on and muddle through and later find that I really did need to have marked the work.Because I know that this is probably how people feel about stitch markers, (well those who haven't seen the light yet at any rate) I really do make an effort not to use them. I just assume that the knitter won't do it, so I try to find another way.
However, sometimes in my knitting pattern I just have to use stitch markers. So, I'd just like you to know, if you're knitting a TeaCosyFolk knitting pattern and I say to use a stitch marker, you really do need a stich marker. I'm not just saying it casually. It's really important and I'm going to refer back to it later, so please, please, please, use your stitch markers, and if you haven't got one, use a bit of waste yarn, it will work just as well. Thank you.
Purling or Knitting 3 or More Stitches Together
There are things we can do to make knitting and life a little easier. Always ready a few rows ahead, then if you see this sort of thing coming up, you can make sure that the row worked beforehand can be a little looser. Looser stitches are easier when you must knit a few together.Likewise, if they are in the first row, cast on loosely. If I need a loose cast-on I hold both needles together when casting on.

If you haven't had time to prepare looser stitches, there are other tips to help.
Try working nearer the point of the needles. Where the needle tapers, the stitch feels looser so you will have more moveable space.
Another thing you could try is to loosen off the stitches. Slipping them from the left needle to the right needle and back again. If this doesn't work the first time, put your needle in the stitch as if you were going to knit or purl it, and wiggle your needles in a scissor-like action to stretch the stitches a bit.
If you're still having no luck, you could (SL1, K2tog, PSSO). The stitch will look as if you K3tog, but it will be less of a fight.
Embroider on a Mouth
I do hear a lot that sewing on mouths is an issue. People feel that their embroidery isn't good and that their mouths are letting their finishing down and leaving them down in the mouth. (sorry couldn't resist!) So I'm going to show you how I do my mouths. I'm not saying that this is the only way or correct way; it's just the way I do them. And maybe this technique will work for you too.I use a technique based on the Lazy Daisy embroidery stitch.
So, the yarn is already secured under the hairline or at the bottom of the head somewhere out of sight. Bring the needle out to where the first corner of the mouth should be.
Then put the needle back into the work, where the second corner of the mouth should be, but importantly, exit the work two or 3 rows down from the corners of the mouth and at the centre point.
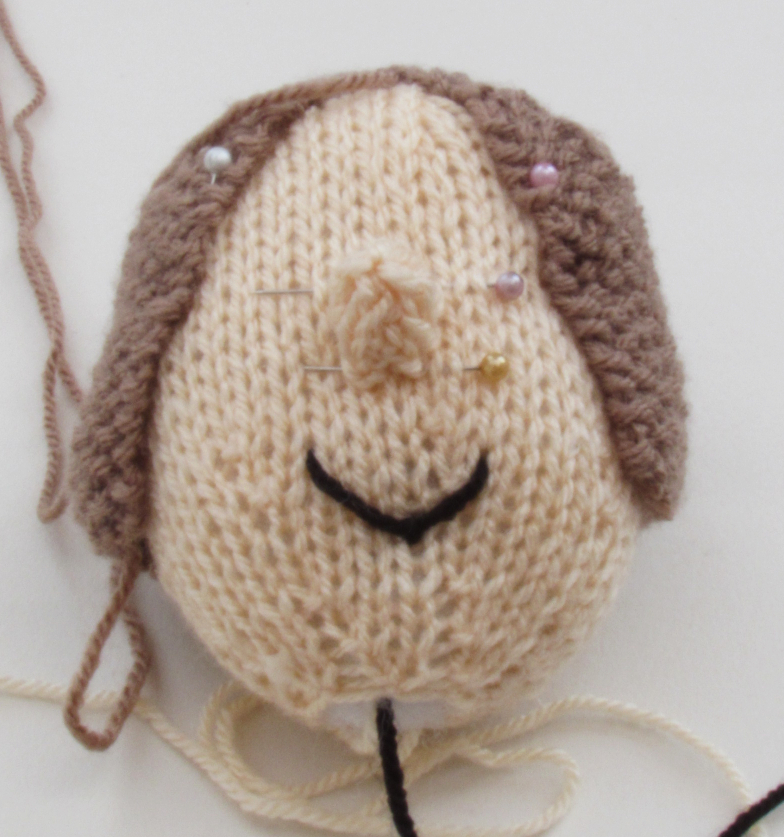
Lightly pull the thread through until the loose stitch makes a pleasing curve. And then, with your needle going over the stitch, put the needle back down the same hole to secure the stitch. Don't pull too hard or the mouth shape will change.
Secure the yarn somewhere un-noticeable.
Scallop Edge Cast Off
People sometimes find it tricky because they cast off the wrong stitches and end up with the wrong number of stitches on the needle. This edging is used on a number of TeaCosyFolk knitting patterns. The stitch numbers may vary but the basics are the same.Unsightly Increase Ladders
 I find that the most common place that this happens in on heads. The increase is always in the same spot, and the ladders occur, and there always tends to be a ladder right up the front of the head, just where you want to crease a face.
The trick is when you sew the head to the main cosy. Attach the head using mattress stitch, and when you get to the bottom of a ladder, make sure that your needle goes through the stitch at the bottom of the ladder, to close it at the bottom. Once the bottom of the ladder is closed the stitches further up will re-adjust and close up, you can speed this up by stroking the ladder.
Closing the ladders will help to make your projects more pleasing and give you better results, especially in prominent places, like heads.
How to Knit The Bubble Stitch Pattern
What, Why and Where Funky Foam?
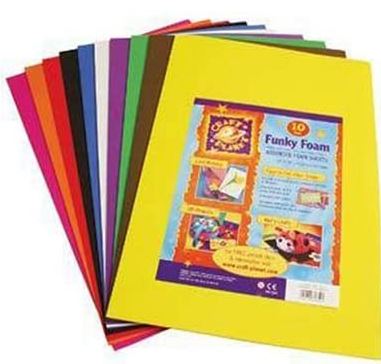 Funky Foam is a brand name for craft foam. You can find it in craft shops, or on Ebay or Amazon. It's thin foam, about as thick as cardboard and is sold in A4 sized packs and it's really cheap.
It's used in knitting patterns to stiffen things to make them stand or to give more structure and shape.
It's better than card because its washable. It's better than plastic because if you bend it, it goes back to its original shape. It comes in all colours so you can get the colour which closely matches your yarn so it's not noticeable.
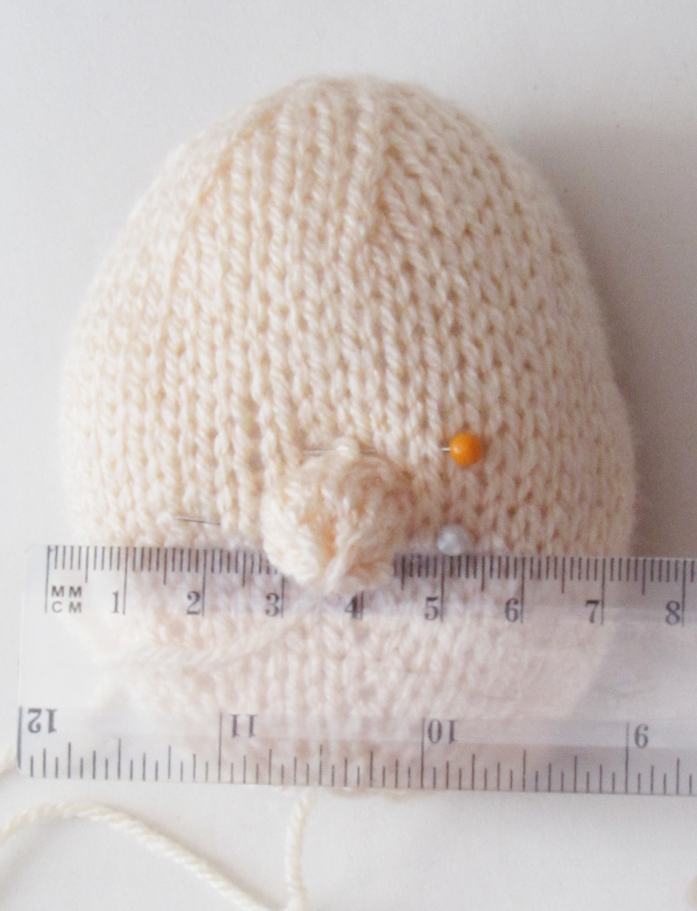
Wobbly Head Syndrome
A floppy head can be caused by prominent teapot lid knob.Firstly, stuff the head so that its about 21cm around the equator and 25cm around from pole to pole and back.
I tend to move the stuffing in the head to hollow out the center a bit to make space for the lid knob.
I sew the head to the top of the cosy with the cast on end of the head 'open'. I find that the last row of the main cosy is about the same size as the bottom of my head. I sew around with mattress stitch. After the first time round, I sew around again just a bit further out and up than my previously stitches.
Always Pin Before Sewing
Always pin it in place first. This gives you a chance to look at the impact of what you're about to do and offers you the opportunity to make changes. It can be a struggle to unpick sewing and it can damage the look of the knitted stitches; and all for the sake of a couple of pins.Using a Hairdryer for Blocking Your Work
In the old days knitting patterns used to ask you to press the knitting before sewing, but nowadays with acrylic yarn pressing the knitting crushes the work and spoils it.
I have recently learned of blocking work with a hairdryer. With this technique, you don’t wet the knitting at all, you just pin out in the position you’d like the work to be, and then you heat with a hairdryer. Warm up the knitting and allow it to cool before removing the pins. I had my hairdryer on the hottest setting and the slowest blow to stop the work from moving around too much. Don’t let the nozzle of the hairdryer touch the work.
It’s a great tip for blocking acrylic yarns such as Stylecraft Special DK or Hayfield Bonus DK.
What is great about this method of blocking is that you don’t have to wait whilst the knitting dries and it’s so quick that if you find it's not quite done the job, you can easily do it again. Plus, if you have a ‘blow cold’ setting on the hair dryer, you could even speed up the cooling time too.
More Than One Knitting Project?
I know some people may think you should finish one project before you start another, but I find it helpful to have more than one project to work on at a time.
Sometimes you don’t always feel like working on your main project. You might be a bit bored or a bit stuck at a tricky bit, or just too tired to concentrate. Or if you go to a knitting group or you have a knit and natter with friends, you need an easier project to work on otherwise with all the chatter, you end up going wrong.This is when another easier project is great. Something easy and simple that doesn’t take too much brain power but something that your hands can keep occupied with.
I also find on long journeys that I want to take some knitting with me, and again I need something that is easy to work on and preferably doesn’t require me to keep looking at it.
Knitting is great for destressing, but not if you’re trying to work out a tricky bit that is stressing you out – so just switch projects and come back to the problem with a clear head, but in the meantime enjoy some easy relaxing knitting.
I would recommend always having 2 projects on the go.
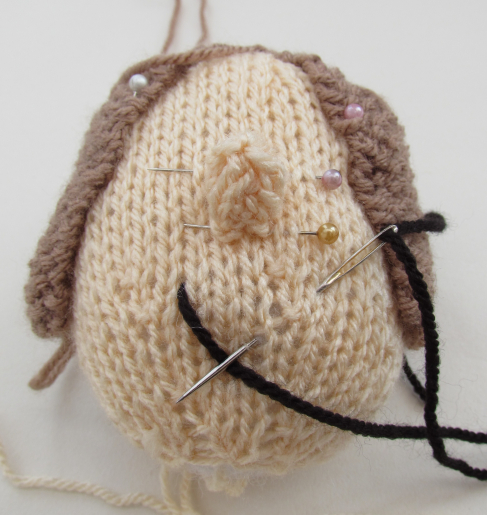
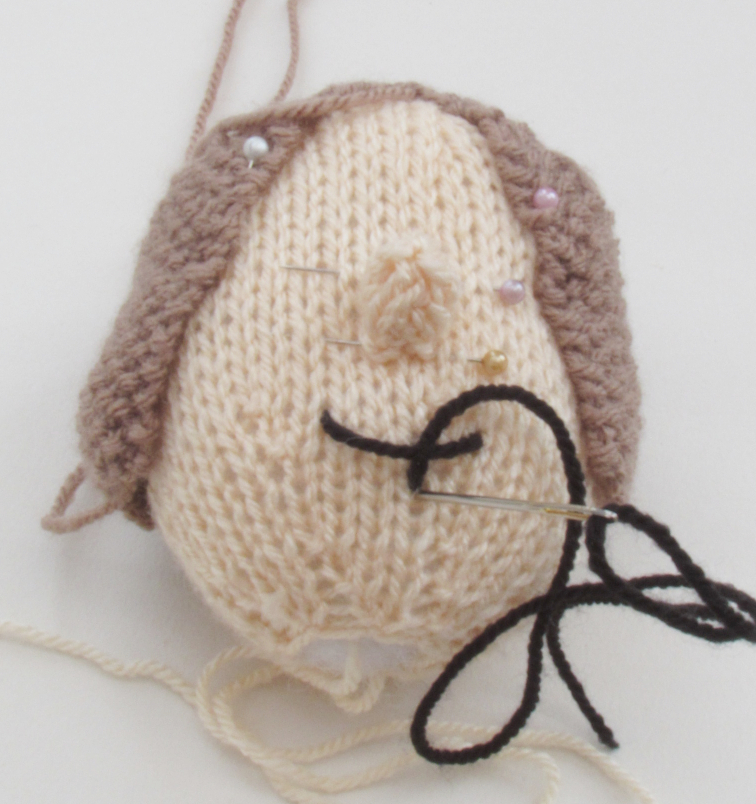
Pinning for Correct Placement
There have been times in my earlier days of knitting when I was so keen to finish up, that instead of pinning out a toy animal’s face first, I just winged it and cracked on with the sewing. Then at the end I was a little disappointed in my end work.
Pinning does take a bit longer, but that extra time is well spent. What you are actually spending the time on is looking to see if it’s right and then making adjustments and looking again. This looking and fiddling with the pinning is what is needed to have an end product that you are proud of, that brings you contentment.I find this is probably most important for animal faces. Pinning out all the facial parts before sewing means that I can adjust the face components so that I don’t end up with a boggle eyed mutant with lopsided ears.
When the Fun Stops, Stop
But knitting should be fun, relaxing and enjoyable. If it's stressing you out, just stop.Maybe you're tired or feeling under the weather, or maybe the penny just hasn't dropped for those few rows. If I keep going wrong and I can't figure it out and it keeps going wrong, I put it down and leave it until the next day. I tend to find that when I come to it afresh the next time, that it clicks and falls into place and I'm happy with my knitting again.
Just remember, knitting is your happy place so it shouldn't be stressing you out.
How to Knit Soapsuds AKA Bobbles
So, the soapsuds are made with a bobble knitting stitch, which can look a bit daunting just written down, but when you see how it's done, you'll wonder what all the fuss is about.I hope you enjoy the video.
Sewing Running Stitches along the Cast On Edge
 I use this instruction usually at the tops of limbs and sometimes on things I want to make into ball shapes. The pattern will say something like, "At the cast-on edge, sew a row of running stitches and draw up".
I have noticed that when I do this at the base of the stitches that sometimes it can make more of a pouting lip finish rather than the finish when you thread and draw, which is the look we're aiming to achieve.
I have been experimenting and I have found that when I do my running stitches over the edge of the cast-on edge (in a more of an over sew or whip stitch way), I end up with a much more professional looking draw up without the pout.
Just a small tip for a better finish.
Labelling
It's a good idea to label the parts you have knitted as you go or pop them into envelopes and write on envelope what's inside.Turning Heads
The process of sewing the head on makes my heads turn through about 45 degrees to the tea cosy's left. Sometimes its ok that they aren't looking dead ahead, but it is nice to have the choice.Because I know my head will turn, I take this into consideration at the pinning stage. I position it where I want it to be, then turn it 45 degrees to the tea cosies right and pin. Then when I sew, its more or less in the first place I positioned it.
I have spoken with other knitters about this issue, and they said that their heads turn too. One lady said that to pin her heads on, she uses the knitting needles she's been working with instead of pins so that the head can't move, which I thought was a neat idea.
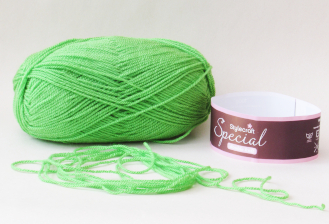
Use The Same Yarn Brands and Yarn for The Best Results
Yarn brands vary from brand to brand and the thickness of their yarns varies too, for example I find Hayfield Bonus DK slightly thicker than Stylecraft Special DK. I am not saying that one is right, or one is wrong, they are just slightly different in the thickness and when you knit with one of them, it will turn out slightly bigger or smaller.If I have designed a tea cosy in Stylecraft Special DK and you knit it up in Hayfield Bonus DK, don't be surprised if it's a bit bigger.
Wool Winder Knitting Tip
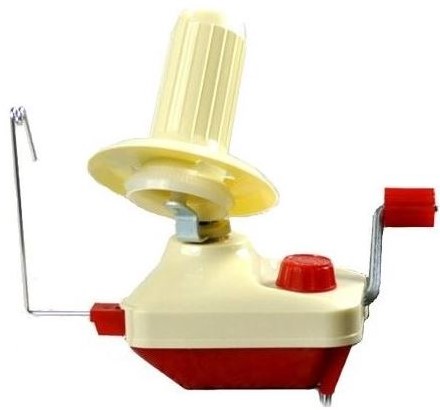 Wool Winders save so much time! All that dividing balls of yarn is easy-peasy with a wool winder. And if you put the main ball on electronic scales as you wind off from it, you will get exactly half on each ball.
I also use my wool winder for those naughty balls of yarn that drop to bits and get all knotty. No more do I battle on with them, I just re-wind them. It's such a joy to have a perfectly appointed ball of yarn to work with.
I also find that once I have re-wound my yarn, that the yarn pulls off the ball much more freely, meaning that my knitting is that bit speedier.
Need more convincing? Kids love wool winders and spend many a happier hour winding balls of yarn for you.
Check Out Wool Winders...
Tips for Positioning Safety Eyes
To make sure that I am getting the safety eyes in the right place, I stuff the head as I would if I were finishing the head. That way I know what the head is going to look like fully stuffed. Then I push the eye stalks through the knitting where I would like the eyes to be.Then whilst holding the eyes in place through the knitting, I partly unstuff the head so that I can gain access to the safety eye stalk on the wrong side of the work and I slip the discs on the back and re-stuff the head.
It's a fiddle and a faff, but well worth it to get the safety eyes in the perfect place.
How Much Yarn for Long Tail Cast-on Starts
I have seen in some knitting discussions that some people find it hard to guesstimate the length of the tail they need to obtain the required number of stitches. One lady said she even used two balls of yarn of the same colour so that she could have a tail of an unlimited length, cast on and then cut the second ball loose. Humm, more ends to sew in.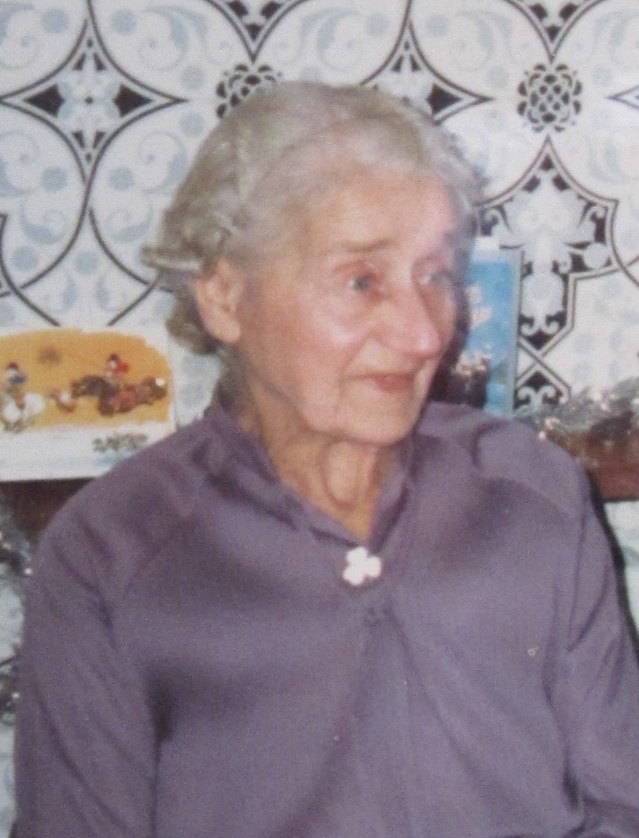 I had no idea it was such a bother, because my Grandma had taught me how to guesstimate my tail when she taught me to knit. I thought I'd share a photo of her with you, she's not with us anymore; her name was Grandma Hall.
The rule of thumb is that 30cm of DK yarn, which is about the length of your knitting needle will comfortably give you about 22sts with a bit left over for stitching up. So, if you want 60sts, you measure the yarn against your needle 3 times and hey presto you have enough.
The same rule applies to Aran yarn or double thickness DK yarn using 5.5mm knitting needles. 30cm of yarn would comfortably give you 14sts, so when I want to cast on 28sts to start a cosy, I measure my knitting needle twice with a little extra for sewing up.
Give it a try and see if this trick works for you. Good old Grandma Hall!
Enough Yarn?
Yarn Chicken is when you perhaps only have three or so rows left to work, and you are unsure if you have enough yarn to complete.I think this happen a lot in tea cosy knitting because for most people I think they make their tea cosies from yarn that is already in their yarn stash.
The tip is that there is a way to guestimate if you will have enough yarn. Spread out the stiches on the needle, and measure the yarn out against the stitches 3 times. This is enough yarn to complete one row. From this you can figure out if you have enough yarn to complete those last few rows or not.
Working Yarn Tension
 Tension is the resistance put on the working yarn. If your tension is tight, it's because the working yarn is held tightly, and it makes the stiches smaller, and the work can be very stiff to knit. If your tension is lose you allow your working yarn to run freely. The stitches will look loose and everything you knit will turn out a tad bigger than you expect.
If your working yarn fluctuates between loose and tight, your stitches will look randomly sized. The stitches will be higgledy-piggledy and won't look neat.
Part of the problem can be caused by your ball of yarn. I like to use Stylecraft Special DK, but that doesn't come in 'balls', so the yarn doesn't pull off freely.
You could use a wool winder and make a yarn cake of the yarn you are using. I do this when I am working on a part that calls for double thickness yarn, but to do this every time I came to knit would be time consuming.
What I do is I unravel some yarn from the main ball so that it won't have to rely on me tugging at every stitch to release some yarn. This way the tension on my working yarn stays constant and my work looks neat.
Keeping Seams Hidden
When I write a pattern, I try to make it so that the seam will go where it's hidden. So, the arm seams will be downwards and underneath, and on a body the seam would usually be at the back. However sometimes, as with a head for example, I can't make it obvious that the seam goes at the back, but it always does.Sometimes, the seam won't be in the obvious place. I am knitting a figure at the moment that will stand leaning up against the main cosy. And in this case, the seams are up the front of the legs and the front of the body, because the figure's front will be against the main cosy and this will mean that the back is exposed and I don't want you to see a seam.
So just take time to think about what is on show and turn seams so that they can be hidden. If you are going to have a seam you can't hide, maybe you can sew the seam with mattress stitch. This gives a neater seam that you won't mind people seeing.
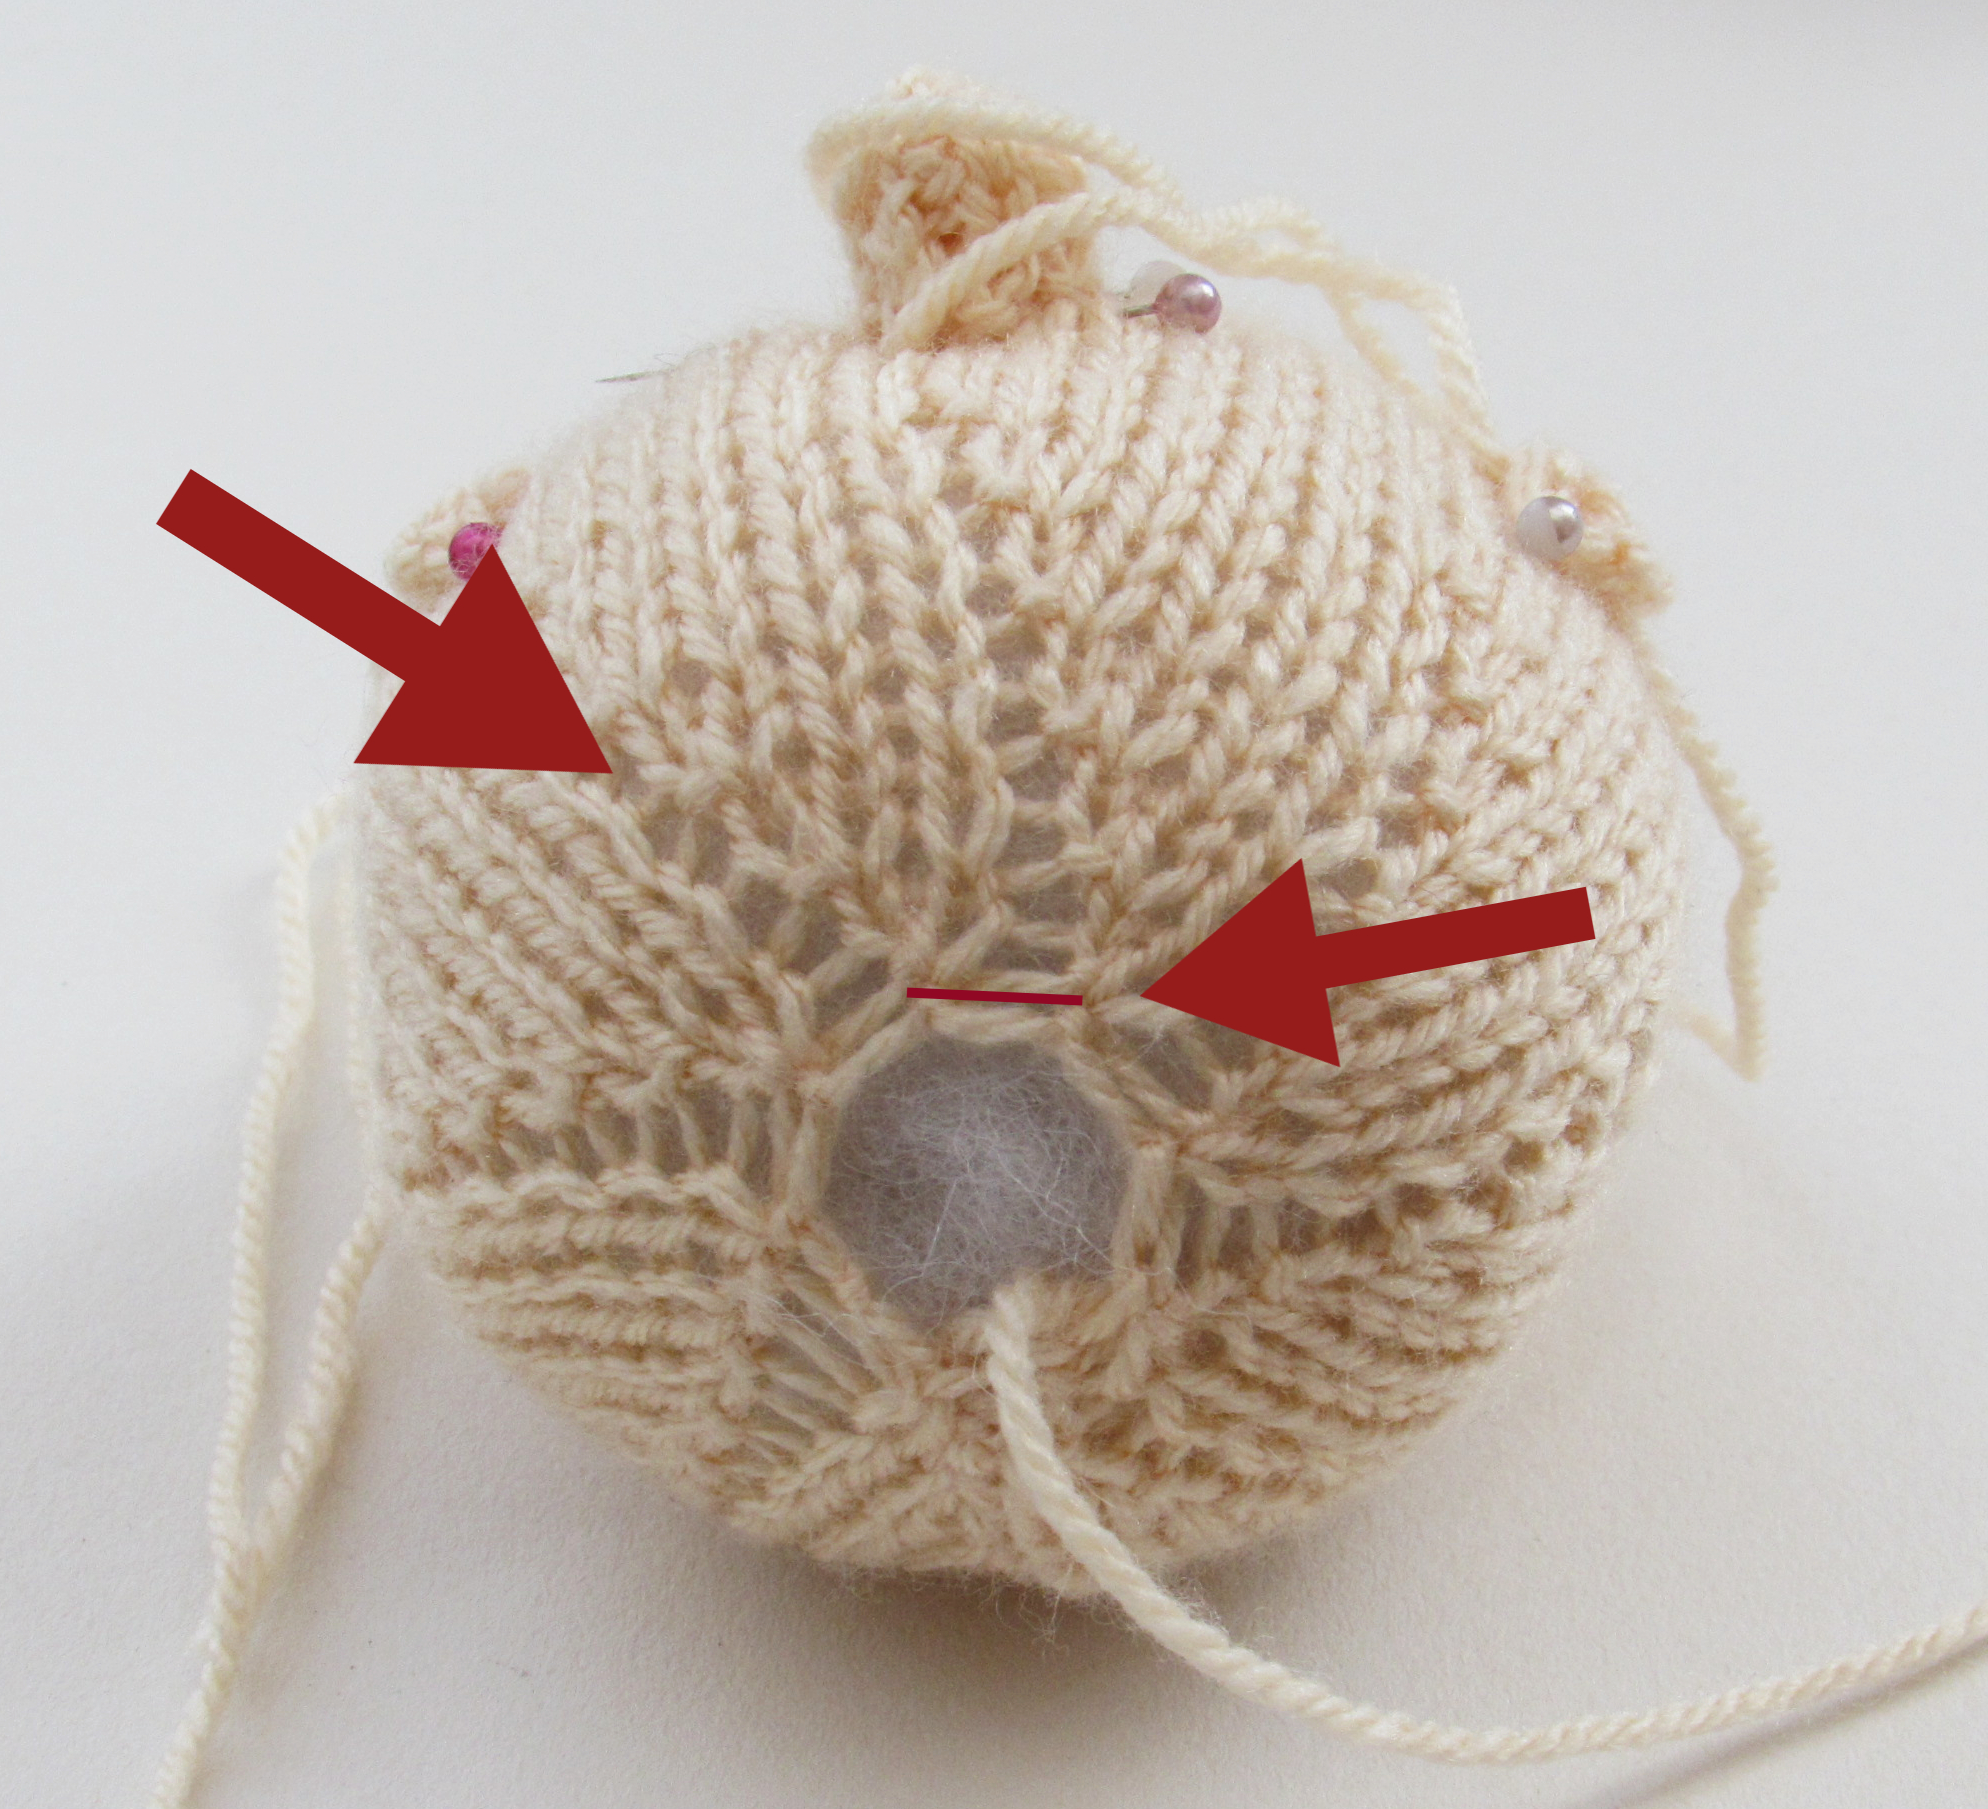
How to Knit into Back Loops from Cast on Edge
It's a great technique, that is nice and neat and looks great. It also saves sewing the rows together at the end. But more importantly for the bottom of a tea cosy, it means that the hem is stretchy, and you need the bottom of your tea cosy to be stretchy so it can stretch over the teapot.Marking Along a Row
Pins and Pegs
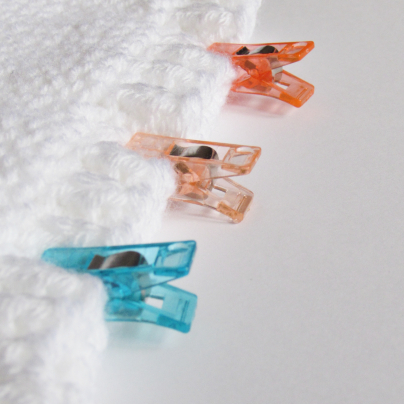 However, with a knitting magazine, I received a free gift of 'No Pin, Sewing Clips'. They are little peg like things that you can use to hold two pieces of knitting together with. Now I know you're perhaps thinking that you can achieve this with pins, and that the pegs are a gimmick. And before using them I would have thought the same; but now I find that I do reach for the pegs as often as the pins. In fact, if I am sewing two flat pieces together, I peg them and if I'm sewing something stuffed to another stuffed thing or the main cosy; I use pins.
I find that the pegs hold things just where I want them, it's like its being held by another finger and thumb. There is no chance of the knitting slipping or of the peg wriggling free.
I'm a convert! If you get an opportunity, try them and you'll see what I mean.
Vintage Tea Cosy Stitch
This is a help video for the vintage tea cosy stitch. This stitch is used on the Crinoline Lady tea cosy and the Virgin Queen tea cosy.It's an easy stitch once you get your head around how to make it billow out.
Working From The Inside
If I'm sewing directly on to the main cosy part, lets say I'm sewing on someone's arms for example, I pin the arms in place whilst the tea cosy is on the teapot. When I'm happy with how it looks, I add a few more pins to secure it in place.Then I remove the tea cosy from the teapot and sew the arm to the main cosy from inside the main cosy. It's great because you can only see the stitches from the inside of the cosy. If you use the same colour yarn as the main cosy itself, you can't even see the stitches from the cosy inside.
You can't always use this technique, but sometimes it's a great trick to use and it gives neat results. It's great for when you want to attach things and you want them to keep their shape and look prominent.
Long Tails
That is when you have finished knitting a project part and you have to cut the yarn from the work, leave a long enough tail to do more than just finish off. Because sometimes you will use that tail to complete a part or sew it onto another part.For example, when you finish knitting the hair, you might have to sew a part of the hair before you pull it on the head. Then once on the head, you will need to sew the hair into place. If you have only left yourself with a short tail, you may not be able to complete all the sewing.
Another top tip… usually the part you are adding is going to be the colour of yarn you will use to sew it into place. Using the hair as an example again, you would sew the hair to the head in the hair colour and not the head colour.
Don't Get Bogged Down in Monotony
The trick is to plan ahead. I have a little look through the pattern to see how many of a thing needs making. Three or over, then I know I will find it hard going. So, to stop my knitting becoming a chore, I have a couple of ideas to stop the monotony.Trick 1 - Don't knit all of the boring parts in succession. Knit a boring thing, and then knit a fun thing. Keep alternating. You'll be super surprised that the boring things just seem to multiply as if by magic.
Trick 2 - Put something interesting to watch on the telly and settle down to doing the boring bits in one hit whilst distracting your mind.
Trick 3 - It's similar to 'Trick 2' only you call a friend or have a social zoom meeting whist knitting. Hopefully by the end of the call the boring bits are done.
Trick 4 - This one isn't always possible. But I like to save long rows of boring knitting that doesn't require much attention for long car journeys when I'm not driving. It is important to have a driver with this tip.
Snipping Threads
Particularly if you are sewing on the right side of the work, if you snip the yarn after finishing off it can eventually start to work its way out and you have an end that you can't sew back in because it's too short and if you snip it again it will eventually work its way undone even more.My top tip is; after the finishing off stitches, push the needle through the stuffed part of the work or along the seam so that it is 5cm or so away from the finishing off site. Then when you cup the yarn, pull it taught so that when you have cut it; it retracts inside the work. That way it can't be seen, and it won't work its way out.
Sewing Up Letting You Down?
My advice would be to practise Mattress Stitch, you can watch a Mattress stitch demo video here.Using mattress stitch gives a virtually invisible join. Not only is it great for seams, but it's also the best way to sew on details to the main cosy such as pockets and heads. Because the sewing up thread crosses over the cast-on edge or row end edges of the piece you are sewing on, it gives a lovely finish and hides the edges.
I read somewhere that Alan Dart always sews up in Mattress stitch and you can't argue with Alan.
Where to buy
Our knitting patterns can be ordered online using this website and they will be instantly available as PDF digital downloads.
Alternatively, you can buy these knitting patterns from our other popular Knitting Pattern Platforms, where you can download them and start knitting today!
Etsy :: Kindle :: Love Crafts :: Ravelry
Find out more about TeaCosyFolk and follow us on Social Media here…
Twitter :: Blogger :: Pintrest :: Instagram :: Giphy :: Youtube :: FacebookTeaCosyFolk in Print
Since 2015 you may have seen TeaCosyFolk designs published in some popular knitting magazines.
Simply Knitting :: Homespun :: Lets Knit
Useful Information
About usAbout Suzy Cowper
Blog
Vlog
Terms & Conditions
Terms of Use
Privacy Policy
Security
Sitemap
Log in
Get in touch


©TeaCosyFolk.co.uk 2026
 Designed and made in the UK
Designed and made in the UK