|
|
Basket
0 items, £ 0.00
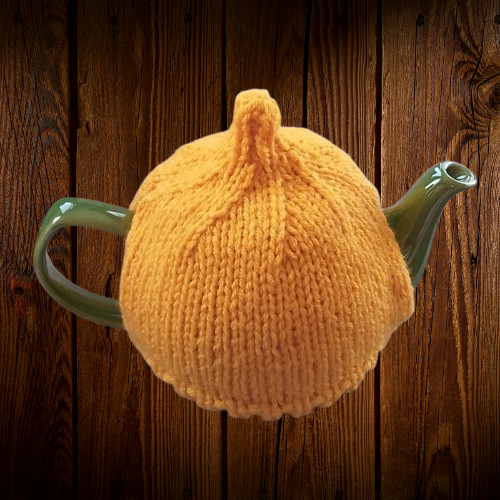
The Unique TeaCosyFolk Head Stabilizer for Character Tea Cosy Heads
One of the questions I’m asked most often is: How do you sew the head onto a tea cosy so it doesn’t wobble about like a bobblehead?
So I set my mind to solving the wobble. I didn’t want to add extra pieces for knitters to make and sew just for structural support. Instead, I needed a clever bit of engineering that could be built into the existing pattern, something simple, effective, and unobtrusive.
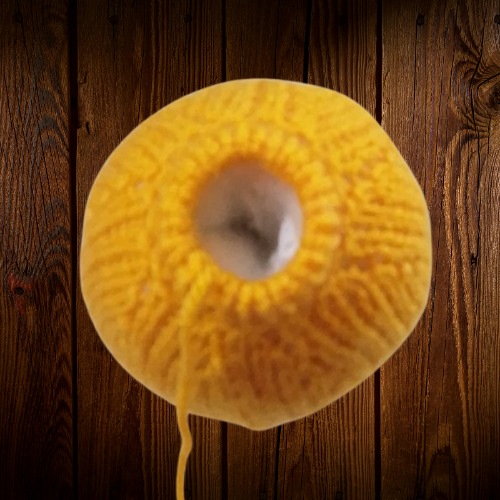
The solution? A tweak to the final decrease row of the main cosy, extended to form a stand up sausage at the centre top. This forms a sturdy peg that supports the head from within. Once you’ve used a pattern that includes the TeaCosyFolk Head Stabilizer, you’ll find it’s compatible with other character style tea cosy patterns where the head sits centrally. Handy for any tea cosy enthusiast with a growing flock.
The stabilizer is knitted directly into the main cosy. When you sew up the cosy and pop it onto the teapot, you’ll see this clever little peg standing proud at the top like a hoopla post, ready to catch the head.
Current patterns with head stabilizers include the Mime Artist Tea Cosy,
Little League World Series Tea Cosy, Jane Austen Tea Cosy, Druid Tea Cosy, Lumberjill Tea Cosy, George and the Dragon Tea Cosy, WRNS Tea Cosy, Spinning Jenny Tea Cosy, Bah Humbug Tea Cosy, and Handbell Ringer Tea Cosy.
The Sugar Lump Ant Tea Cosy will be added to this list shortly, along with any future designs where head stabilizers are feasible.
Knitting support structure for character heads.
In the Sugar Ant Tea Cosy, for example, the peg supports the next body part rather than a head, but the principle is exactly the same.
To attach the head (or in this case, the mesosoma), start by stuffing it firmly. A well stuffed piece holds its shape better and won’t look dwarfed by other parts. Once stuffed, press your finger into the centre to create a hollow where the stabilizer will sit.
Stuffing and how to make knitted heads stand upright.
I find it easiest to remove the cosy from the teapot at this point. Slip a finger into the stabilizer like you’re putting on a glove, then press it gently into the hollow you’ve made in the stuffing. This keeps the stabilizer from being crushed and positions it securely inside the head.

Knitted structural engineering is the best way to sew head onto tea cosy.
Then, without jostling too much, pop the cosy back onto the teapot. Pin the cast on edge of the head to the base of the stabilizer, and use mattress stitch to sew it neatly in place.
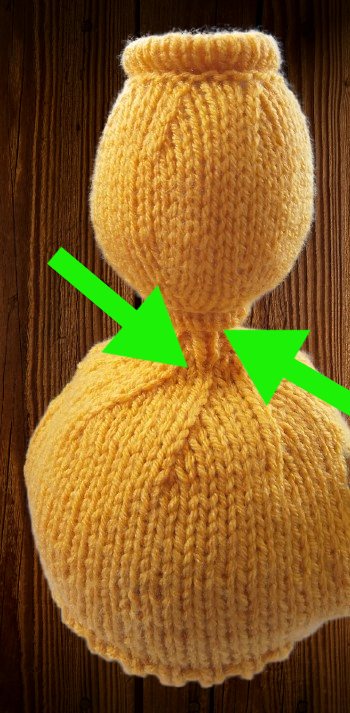
Bring the cast on edge of the head right down to the base of the head stabilizer.
This little bit of structural magic gives your character a self supporting head with minimal extra knitting or sewing and maximum charm.
“I have used the the head stabiliser in the little league tea cosies.
Such a brilliant idea and I found it really easy to include it in the knitting of the tea cosy.
The head stays firm and in place when sewing the head on.”
Kathy Dodge
Tags:
how to attach head to knitted tea cosy, stabilizing knitted toy head, knitting structural support techniques, knitting tips for 3D character, tea cosy, wobbly head, sewing up tea cosy tips, character tea cosy pattern, knitted tea cosy with head,